1Introduction
This manual explains the installation, configuration and usage of the payment module for Shopware and Unzer.
Before beginning with the installation, please make sure that you are in possession of all necessary data:
- User name and password for the login to the backend of Unzer
- Shopware payment module as ZIP file.
- Access data to your server and shop
Partial cancellations can only be processed in a limited manner via the shop backend. You may select the option "Close order" while capturing an order, then all items not part of the capture will be cancelled. Pure partial cancellations must be processed via the Insights of Unzer.
The checkout must be served via https for the payment methods to be available.
Note that you must use at least PHP version 5.6 for our plugins. PHP 8 or higher is currently not supported.
1.1Procedure of the Installation
In this document you will find all important information for the installation of the module. It is important that you strictly follow the checklist. Only this will guaranteed a secure usage of the plugin in correspondence with all security regulations.
- Configuration of the test environment by means of the integration data from Unzer. These can be found on the test platform under https://sbx-insights.unzer.com/
- Configuration of the basic settings of the payment module
- Configuration of the payment methods
- Carrying out of a test purchase by means of the attached test data at the end of this document
- If the test was successful, you can configure the live data in your shop. Log into the live environment with the obtained access data under: https://insights.unzer.com/
In order to test the module, any kind of directory protection or IP blocking on your server must be deactivated. This is crucial as otherwise the payment feedback of Unzer might not get through to the shop.
1.2System Requirements
In general, the plugin has the same system requirements as Shopware. Below you can find the most important requirements of the plugin:- PHP Version: 5.4.x or higher
- OpenSSL: Current version with support for TLS 1.2 or higher.
- fsockopen: The PHP function fsockopen must be enabled. The plugin must be able to connect to external systems over the Internet.
- PHP Functions: All common PHP functions must be enabled.
2Configuration
2.1Live Environment
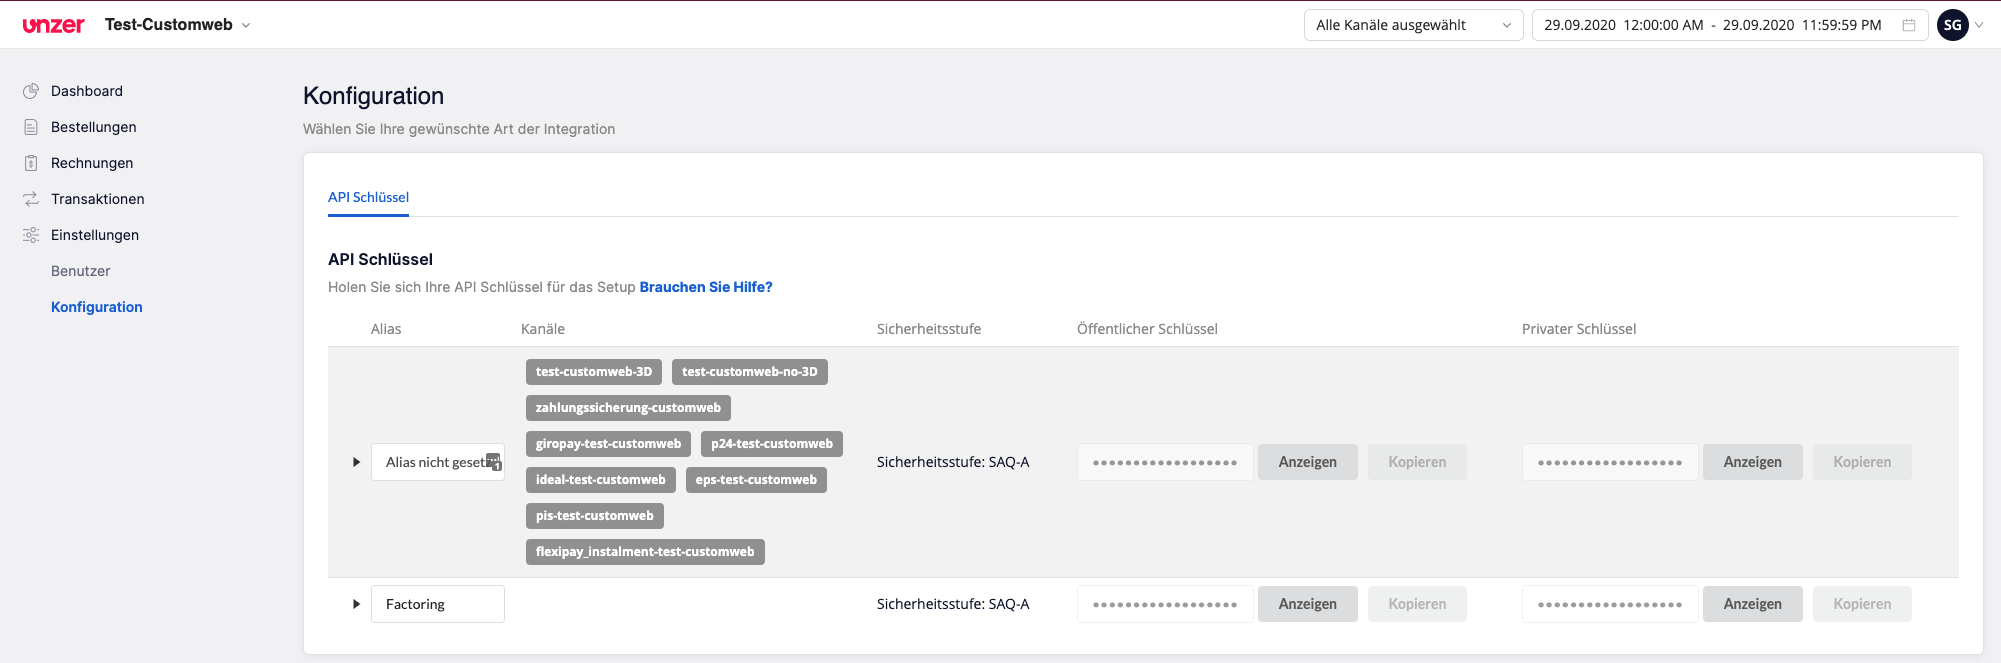
You find the necessary credentials in your Unzer Account (https://insights.unzer.com/). You need the following:
- API Private Key
- API Public Key
Log into your Unzer account and go to "Settings > Configuration". There you'll find the necessary credentials.
Now enter those two keys into the main configuration of the plugin in your shop.
2.2Test Environment
To login to the test environment you can use the following URL: https://sbx-insights.unzer.com/3Module Installation and Update in the Shopware Shop
3.1Installation
At this time you should already be in possession of the module. In order to install the module in your shop, please carry out the following steps:
- Unzip the archive you have just downloaded.
- In the unzipped folder navigate to the folder "files"
- For some shops there are different versions of the plugin provided. If this is the case open the folder which corresponds to your shop version.
- Using your preferred FTP client upload entire content of this folder into the root directory of your shop. For some shops there is a specific folder containing the plugins. If that is the case upload the plugin into this folder. Make sure that the folders aren't replaced but merely merged.
- If you haven't yet done so, log back into your shop.
3.2Updates and Upgrades
You have direct and unlimited access to updates and upgrades during the duration of your support contract. In order to receive constant information about available updates we ask you to subscribe to our RSS feed that we publish for your module.
We only recommend an update if something doesn't work in your shop, if you want to use new feature or if there is a necessary security update.
3.2.1Update Checklist
We ask you to strictly comply with the checklist below when doing an update:
- Always do a backup for your database and your files in your shop
- Use always a test system to test the update process.
- Wait until all the files are copied to the shop, clear the cache if there is one in your shop and then visit the configuration page of the main module so that the update process will be initialized.
Please test the update procedure first in your test shop. Our support team is able and willing to help you if you experience problems with the update process.
Depending on the version it could be that the database has to be migrated. We recommend you therefore, to perform the updates in times when the shop is not visited too frequently by your customers.
3.2.2Update Instructions
Please always read the update instruction. Those instructions can be found in the changelog. If there are no special remarks, you can proceed by just overwriting the files in your system.
3.2.3Updated Plugin from the UnzerCw to the CwbUnzerCw Version.
We plan to release this plugin in the shopware store in the near future. To make this possible we hda to apply some changes to our code. Most important a prefix for our PHP classes is required and the plugin folder had to be renamed. To update to this new version simply overwriting the existing files is not possible. This sections describes the steps required to update the module in detail.
Please test the update procedure first in your development system. So you can ensure the update is working correctly.
If you are using multiple plugins from us. You need to update all of them to the new version.
- Activate the maintenance mode of the shop.
- Make a backup for your database and your files in your shop. Without this you will not be able to revert to the old version, if anything goes wrong.
- Upload the new plugin files.
- Deactivate the existing plugin. Do not deinstall the old plugin yet.
- Install and activate the new plugin.
- If you have custom css or template files for the plugin, adapt the changes to the new plugin.
- If you are using the Shopware API endpoint of this plugin, update the URL to new endpoint.
- Verify the main and method settings.
- Deinstall the old plugin.
- Delete the files of the old plugin. The following files/folders must be removed, if they exist:
- engine/Shopware/Plugins/Local/Frontend/UnzerCw
- engine/Library/Customweb
- engine/Library/Crypt
- engine/Library/File
- engine/Library/Math
- engine/Library/Mobile
- engine/Library/Net
- engine/Library/PhoneNumber
- engine/Library/System
- engine/Library/loader.php
- engine/Library/openssl.cnf
- Make a test transaction to verify everything is workin correctly.
- Deactive the maintenance mode of the shop.
4Module Configuration in the Shopware Shop
The configuration consists of two steps. The first step is the configuration of the main module with all the basic settings (cf. Configuration of the Main Module). During the second step you can then carry out individual configurations for each payment method . This allows for full flexibility and perfect adaptation to your processes.
Please create a backup of the main directory of your shop. In case of problems you will then always be able to return your shop to its original state.
We furthermore recommend testing the integration on a test system. Complications may arise with third party modules installed by you. In case of questions, our support is gladly at your disposal.
4.1Configuration of the Main Module
In order to install the main module search for Unzer under Settings > Plugin Manager . Click on the + symbol in order to begin the installation process. Afterwards, click the "edit" symbol and configure the main module.
Enter the individual options which you partly may have already used for the configuration of the administration interface of Unzer. Should an option not be clear to you, you can click on the question mark and will find further information on the settings.
4.2Configuration of the Payment Method
After having configured the main module, you will find all payment methods under Settings > Payment Methods. Activate each payment method you wish to offer in your shop. You can save individual settings for each payment method (and for each shop in case of a multi-shop set-up) and thereby optimally adapt the payment methods to your existing processes. The most central options are described in more detail further below.
4.3Assigning the Payment Method to the Shipping Costs
In order for the transactions and the shipping costs to be matched correctly to the payment methods you need to assign the payment methods to the shipping methods. Go to settings > shipping costs. Open all the shipping costs and add a payment method.
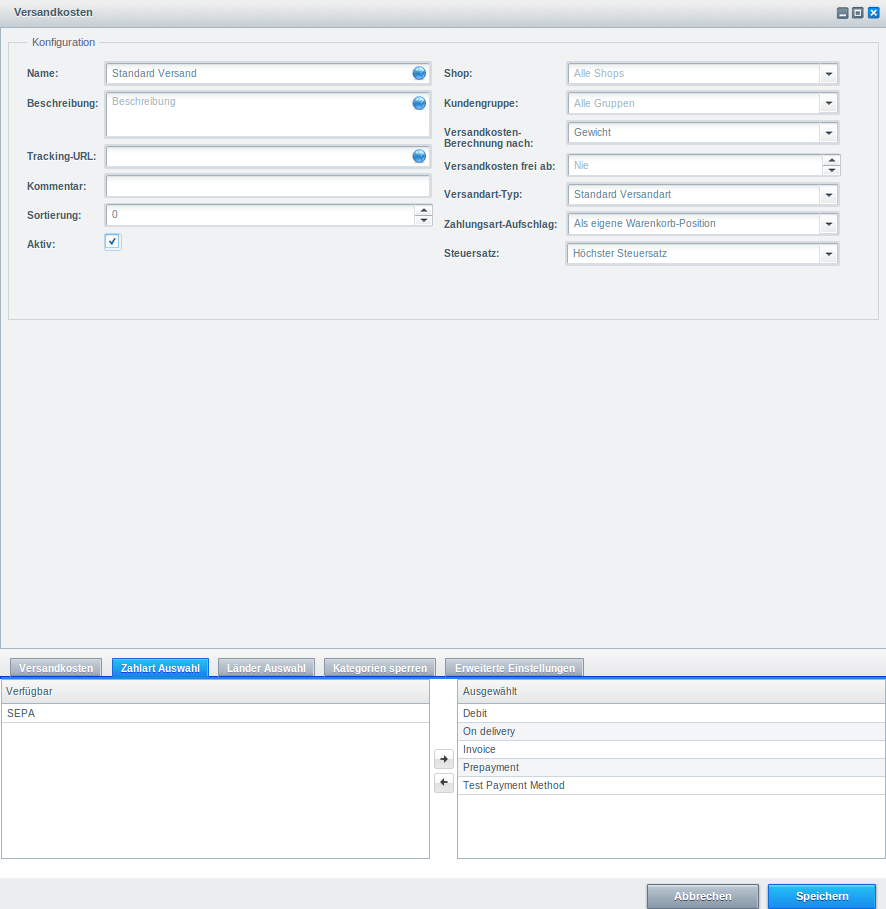
Depending on the amount of delivered payment methods, it may be that certain payment methods can't be attributed to a specific shipping method as not all payment methods can be displayed. This is a known bug of Shopware. Merely the first 30 payment methods are displayed. Please delete all payment methods that you don't need and then all other payments will be displayed.
4.4Direct Capturing of Transactions
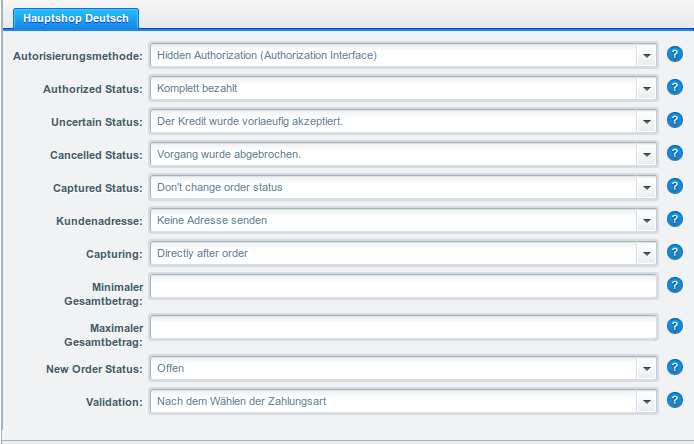
The option "Capture" allows you to specify if you wish to debit payments directly or if you first wish to authorise them and then debit the payment at a later point.
Depending on your acquiring contract, a reservation is only guaranteed for a specific period of time. Should you fail to debit the payment within that period, the authorisation may therefore no longer be guaranteed. Further information on this process can be found below.
It may be that settings saved in the payment modules overwrite settings saved in Unzer.
4.5Uncertain Status
You can specifically label orders for which the money is not guaranteed to be received. This allows you to manually control the order before shipment.
4.5.1Setting the order state
For each payment method you may select in which state the order should be set to depending on the booking state. This is the initial state of the order.
4.6Optional: Validation
Note: It can be that this option is not visible in your module. In this case just ignore this section.
With the option 'Validation' you can define the moment when the payment method should be made visible to the customer during the checkout process. This setting is relevant for modules where the usage depends on the customer's compliance with specific preconditions. For example, if a solvency check has to be carried out or if the payment method is only available in certain countries. In order for the credit check or address validation to also work with European characters, the charset of the "Blowfish mode" must be set to "UTF-8" for certain PSP settings.
You have the choice between these options:
- Validation before the selection of the payment method: A validation verification is carried out before the customer selects the payment method. If the customer does not fulfill the requirements, the payment method is not displayed
- Validation after selection of the payment method: The verification of the compliance occurs after the selection of the payment method and before the confirmation of the order
- During the authorisation: The validation verification is carried out by Unzer during the authorisation process. The payment method is displayed in any case
4.6.1Usage of the Integrated Multishop Functionality of Shopware
The payment module supports the multishop feature of Shopware. No further modifications are necessary. The module automatically recognizes the shop the order belongs to. In order for the multishop functionality to work, it is, however, necessary that the individual sub-shops within Shopware have been configured correctly.
5Settings / Configuration of Payment Methods
5.1General Information About the Payment Methods
The plugin contains the most common payment methods. In case a desired payment method is not included per default, please contact us directly.
In order to be able to use a payment method, it must be activated in your account with Unzer as well as in your shop. Information about the configuration of the payment methods can be found further above.
Below you can find important information for specific payment methods that deviate from the standard process.
5.2Information on Payment Status
For each payment method you can define an initial payment status (status for authorized payments etc.). You hereby define the payment status for each state depending on the processing type of the order (captured, authorized, etc.). It's the initial status which the order assumes. Depending on the mutation carried out by you, the status can change.
Never set the status to Pending Unzer or any similar pending status which is implemented by the module.
5.2.1Order status "pending" / imminent payment (or similar)
Orders with the status 'pending Unzer' are pending orders. Orders are set to that status if a customer is redirected in order to pay but hasn't returned successfully or the feedback hasn't reached your shop yet (Customer closed window on the payment page and didn't complete payment). Depending on the payment method these orders will automatically be transformed into cancelled orders and the inventory will be cleared (so long as the Cronjob is activated). How long this takes depends on the characteristics of the payment method and cannot be configured.
If you have a lot of pending orders it usually means that the notifications from your webserver to Unzer are being blocked. In this case check the settings of your firewall and ask the Hoster to activate the IPs and User Agents of Unzer.
5.2.2Order status "cancelled"
Orders with the status "cancelled" have either been set to that status automatically due to a timeout, as described above, or have been cancelled directly by the customer.
5.3Invoice
The fundamental concept of invoice is that the goods are shipped before the buyer pays the outstanding amount. That implies that the buyer has a limited time to carry out the payment to the merchant's bank account.
In case the buyer returns some of the items, you should create a refund. This does also work if the buyer has not yet paid the invoice. In this case, the outstanding amount will be reduced accordingly.
5.4Prepayment
In case of prepayment, the buyer has to pay the invoice before the merchant ships the goods.
To realize this process, the shop needs to be informed about incoming payments. For this purpose the order is marked as uncertain until Unzer notifies the shop about the successful payment via a background request. This leads to the uncertain state being lifted and is the trigger to go ahead and start the shipment process.
In case the customer decides not to order all items, you can create a refund. This is possible even before the buyer has paid the amount. In this case the outstanding amount is reduced so that the lower payment by the buyer will still trigger the shipment process by lifting the uncertain state.
5.5Instalment
Instalment as a payment method allows the buyer to pay the outstanding amount in multiple slices.
Similar to invoice, the instalment payment method relies on the shipment to determine
the due dates of the different slices. You can use the deferred capture operation to let
Unzer know when the shipment is ready. In case you like to reduce the amount,
you can do this as part of the capture. The plugin will carry out corresponding
cancel requests and send the delivery notification to Unzer.
Although it is possible to trigger the delivery notification, called finalize, in
Unzer's Insights, we strongly recommend you to do it in the shop's backend.
In case you need to reduce the amount of the slices at a later point in time, you can do refunds.
5.6Secured Invoice
The fundamental concept of invoice is that the goods are shipped before the buyer pays the outstanding amount. That implies that the buyer has a limited time to carry out the payment to the merchant's bank account.
This process has implications on to the shipment. In case the goods are not in stock, it is important not to capture the amount directly because with the capture the shipment notification is sent out and the due date is defined relatively to this point in time. In other words, you should configure the payment method to just authorize the payment and capture the amount once the goods are ready to be shipped. This process is also recommended for other payment methods, if the goods are out of stock. In Unzer Insights, the execution of the shipment notification is called finalize. The finalize operation is triggered with the capture. If only part of the amount is captured, the corresponding reduction will be applied automatically.
In case the buyer returns some of the items, you should create a refund. This does also work if the buyer has not yet paid the invoice. In this case, the outstanding amount will be reduced accordingly.
6The Module in Action
Below you will find an overview of the most important features in the daily usage of the Unzer module.
6.1Recommended Practice
Generally the most of the actions can be carried out from within the shop backend or from within the Unzer Insights. Not all actions that are triggered in Insights can be transferred correctly to the shop backend.
As such it is recommended to use the shop backend to carry out those actions (like refunds, cancels, captures etc.). This way both systems stay in sync.
6.1.1Manual booking on "Unzer Invoice Secured"
In the case of the "Unzer Invoice Secured" payment method, please mind to manually capture the transaction. This would change the transaction process in such a way that you would not be able to cancel such a transaction afterwards.
6.2Capturing / Canceling of Orders
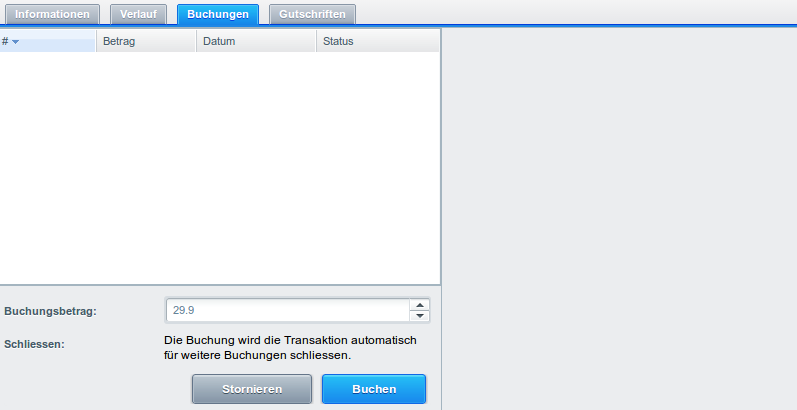
6.2.1Capturing Orders
The transaction management between your shop and Unzer is not synchronized. If you capture payments with Unzer, the status in the shop will not be updated and a second capturing in the shop is not possible.
In order to be able to capture orders, you must make sure that you have set 'Capturing' to deferred in the configuration of the payment method.
Open the order you wish to capture and switch to the tab Transactions. Here you will find the tab Captures. Enter the amount you wish to debit from the customer's card. By clicking Capture, a direct capturing of the order occurs with Unzer.
6.2.2Cancellation
By clicking the button Cancel, you delete the initial authorization on the customer's card. The pre-authorized amount is released from the customer's card.
6.3Useful Transaction Information on the Order
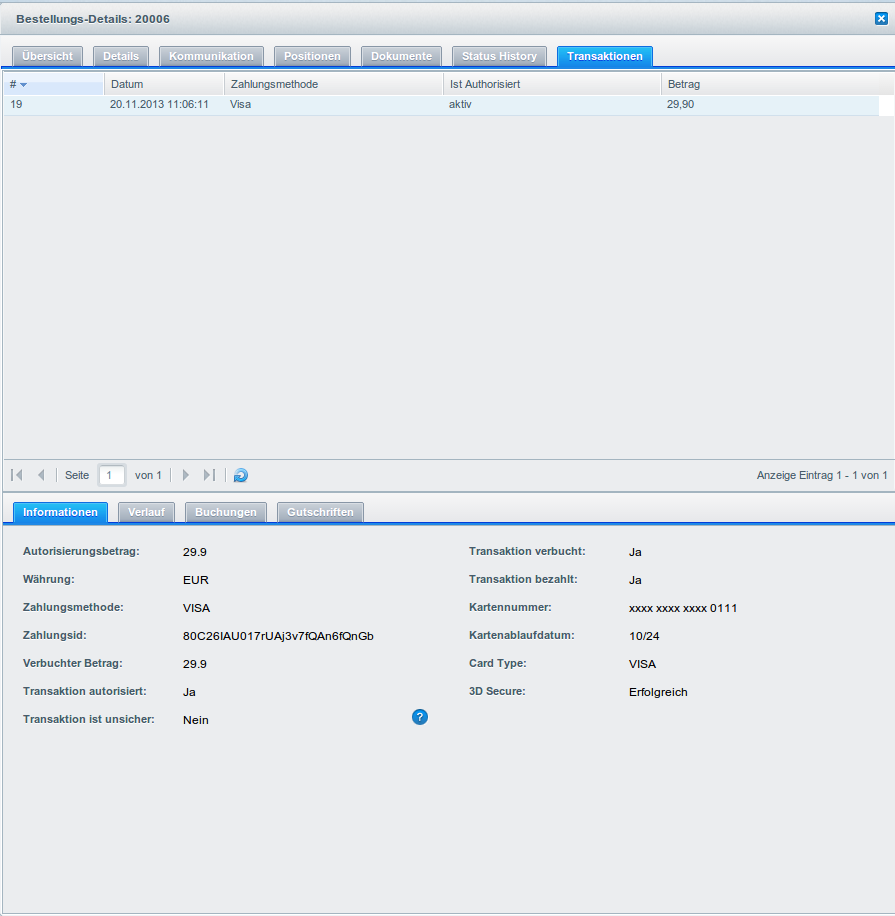
In each order, processed via our module, you can find an overview of the most important information about the transaction as well as a transaction history.
In order to get to the transaction information, open the order and switch to the tab Transactions. Here you will find all authorization attempts and the related information.
6.4Using Invoice Details of a Processor
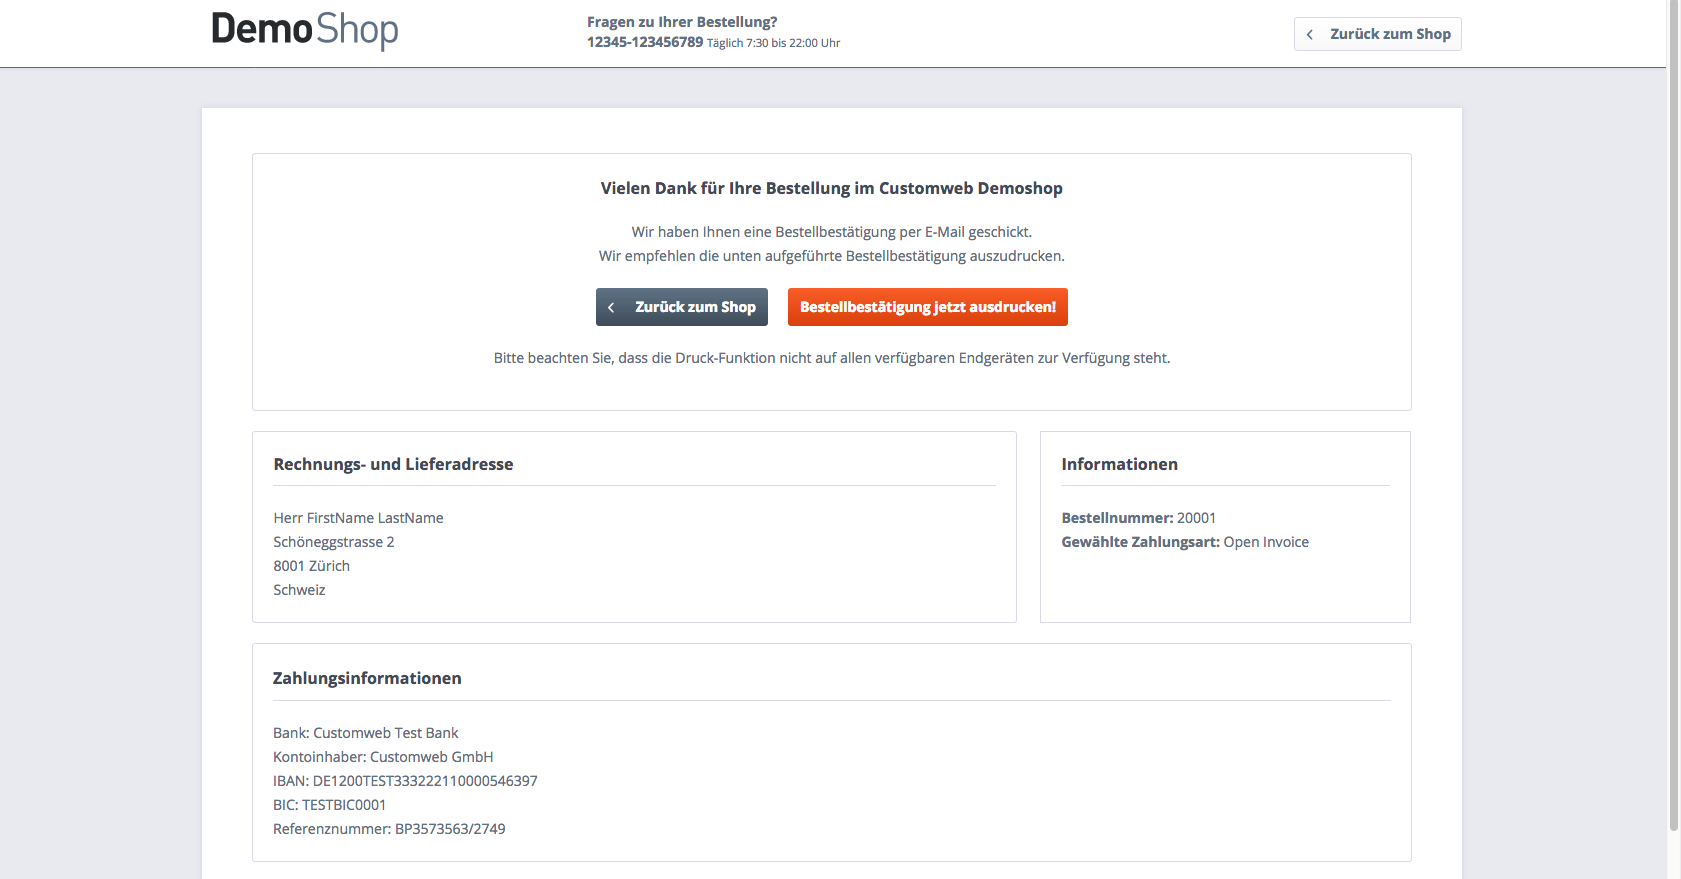
In the following context you can view or embed the "payment details" of for example an "Open Invoice" transaction:
6.4.1Shopware Order Confirmation (E-Mail)
Please add the following code block into your Shopware email template, if you want to send the payment details of the processor in the mail confirmation sent to the customer:
- HTML Mailtemplate
- PLAIN Mailtemplate
{if $paymentInformationHtml}
{$paymentInformationHtml}
{/if}
{if $paymentInformationPlain}
{$paymentInformationPlain}
{/if}
6.4.2Shopware Invoice (PDF)
Due to technical limitations, it is currently not possible to display the "payment information" here.
6.4.3Shopware-Backend (Transaction details)
You can view the payment and transaction details in Shopware under Customer > Payments > Unzer.
6.4.4Shopware Success-Page
6.5Refunds
You can refund already captured transactions and automatically transmit them to Unzer. In order to to so, open the order. Switch to the tab Transactions. A new window will open up in which you must then switch to the tab Refunds in order to refund orders.
To refund a line item you need to enter the quantity you wish to refund. By clicking Refund, the refund is automatically transmitted to Unzer. It will than be refunded via the payment method the customer chose for the transaction.
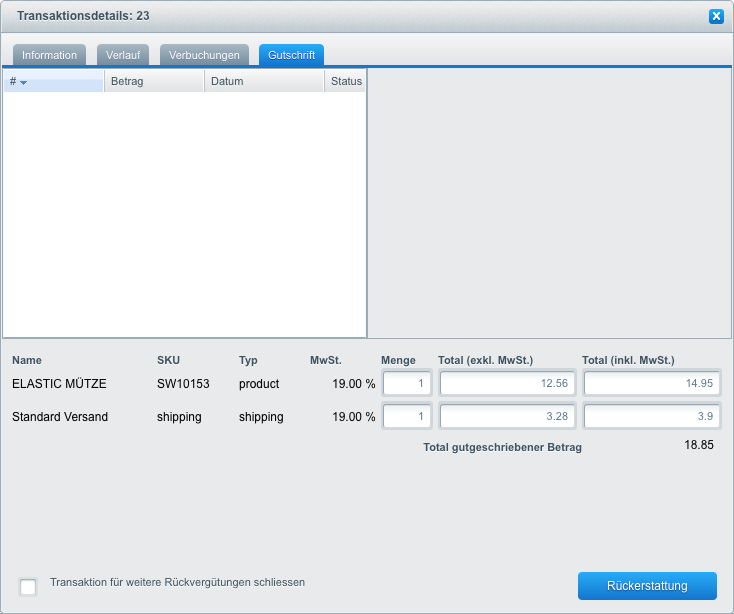
Please note that you can't refund more than 100% of the original amount.
Executing a refund will not change the status of the order.
7Getting the Credit Card Data via Shopware REST API
When connecting ERP systems to Shopware it may be that further information is required via Shopware API. Our module provides you with a lot of payment information also via Shopware REST API.
Basic Information about the usage of the REST API of Shopware can be found in the Shopware Developers Guide.
The service can be called up under https://www.shop-url.com/api/CwbunzercwTransactions. The call of the above URL leads to the listing of all transactions. By adding the Transaction ID you can filter by the corresponding Transaction ID. The Transaction ID can be found in the order overview (Customer > Payments > Unzer )
Additionally, you can also access the transaction via the Payment ID (transmitted through Unzer). To do so, the parameter 'usePaymentId=1' has to be added as a parameter to the URL.
8Set-up a cron job to activate the timed operations
To activate the timed operations of the plugin (e.g. update service, deleting pending orders, etc.) make sure that you set up the Shopware Cron engine. Especially the update function allows you to automatically retrieve additional information or changes of your order directly via the API of Unzer. For payment methods which use a delayed authorisation process this is mandatory. Please note it could be that in order to use the update feature it may be necessary that Unzer activates additional options in your account.
The module uses the standard cron engine of Shopware. More information regarding the set up can be found here: https://community.shopware.com/Cronjobs_detail_1102.html.
8.1Partial Cancel
If you set the checkbox "close transaction for further captures" then the rest amount which has not been captured will be cancelled.
If you want to initiate a partial cancellation on an authorize transaction and allow further captures to be made, you must initiate the partial cancel from the Unzer backend.
The transaction allows only refunds when the transaction has been closed for further captures.
9Testing
Before switching from test to live mode it is important that you test the module extensively.
Do not forget to switch the operating mode from test to live after having successfully tested the module.
9.1Test Data
In the following section you can find the test data for the various payment methods:Card number 4711 1000 0000 0000 Expiry Date 12/2030 CVC 123 3D PW secret!33 | Visa Success |
Card number 5453 0100 0005 9543 Expiry Date 12/2030 CVC 123 3D PW secret3 | Mastercard Success |
Username keychain Password 123 |
Username keychain Password 123 |
Bank / Issuer Stuzza Bank Username 1003993 Password rX/'PvZzIW?& | EPS Simulation |
Account Bankname ING_TEST |
Bank number 12345679 Account number 0000000300 IBAN DE46940594210000012345 BIC TESTDETT421 User chiptanscatest2 User PIN 12345 User TAN 123456 TAN mechanism optical Chip-TAN |
Bank number 00000 Account number 123456 User PIN 123456 User TAN 12345 |
10Errors and their Solutions
10.1The Referrer URL appears in my Analytics Tool
When a customer and the notification are redirected via Header Redirection, the Unzer Referrer URL might appear in your Analytics Tool thus hiding the original traffic source. However, most Analytic Tools are able to minimize this problem.
In case you are using Google Analytics as reporting tool, this step by step guide may help you to exclude the URLs: under bullet point 4.
11Compatibility with Third-Party Plugins
The plugins listed below are compatible with our payment modules and allow you to handle certain tasks in an easier way.
11.1Birthday and gender in Shopware
For certain payment service providers it is necessary to check the birthday and the gender of a customer. Shopware does not check this by default. To enable these checks go to "Configuration > Basic Settings > Frontend > Login / Registration" and check the following parameters:
- Show Birthday Field
- Birthday is required
- Show "I am" select field
12Error Logging
The module will log different unexpected errors or information depending on the configured level. If there is any issue with the module, this log can help identify the cause.
12.1Log Levels
You can configure the log level in the Unzer settings.
- Error: Logs unexpected errors only. (Default)
- Info: Logs extended information.
- Debug: Logs information helpful for debugging.
12.2Log Location
The log file is stored in the Shopware log directory. Please make sure the path exists and it is writable by the webserver. (Default Path: {shopRootDirectory}/logs or {shopRootDirectory}/var/log)
13Advanced Information
This section of the manual is for advanced usage of the module. The content is for advanced users with special requirements. Everything in this section is optional and not required for the daily usage of the module.
13.1Transaction Object
This section describes how to extract information from a transaction, if you need it for further processing. E.g. you require more information of the transaction for further processing an order in your ERP system.
The code snippets in this section assume your script resides in the root folder of the shop with the default shop folder structure.
require __DIR__ . '/autoload.php';
use Shopware\Kernel;
$environment = 'production';
$kernel = new Kernel($environment, false);
$kernel->boot();
$pluginPath = 'engine/Shopware/Plugins/Local/Frontend/CwbUnzerCw';
Shopware()->Loader()->registerNamespace('Customweb', 'Customweb/');
Shopware()->Loader()->registerNamespace('CwbUnzerCw_Helpers', $pluginPath . '/Helpers/');
Shopware()->Loader()->registerNamespace('CwbUnzerCw_Entities', $pluginPath . '/Entities/');
Shopware()->Loader()->registerNamespace('CwbUnzerCw_Components', $pluginPath . '/Components/');
Shopware()->Loader()->registerNamespace('Shopware\Components\Api', $pluginPath . '/Components/Api/');

require_once $pluginPath . '/Library/loader.php';
Customweb_Core_Util_Class::registerClassLoader(function ($className){
	return Shopware()->Loader()->loadClass($className);
});
	Customweb_Core_Util_Class::registerClassLoader(function($className){
		if(strpos($className, 'UnzerCw') === 0){
			$fileName = substr($className, strrpos($className, '_')+1).".php";
			if(file_exists('engine/Shopware/Plugins/Local/Frontend/CwbUnzerCw/Legacy/'.$fileName)){
				require_once 'engine/Shopware/Plugins/Local/Frontend/CwbUnzerCw/Legacy/'.$fileName;
				return true;
			}
		}
		return false;
	});
$transactionById =  CwbUnzerCw_Helpers_Util::loadTransaction($transactionId);
$transactionObject = $transactionById->getTransactionObject();