1Introduction
First of all, thank you for placing your trust in us and purchasing the Magento Dunning extension. This document contains everything you need to know in order to install and configurate the Magento Dunning extension. The following modules are within the scope of the Magento Dunning extension:
- Magento Dunning Extension
- PDF-Template
Please be advised that this product will be replaced by our new Magento offering on wallee. More information can be found on our Magento Page.
Note that you must use at least PHP version 5.6 for our plugins. PHP 8 or higher is currently not supported.
####conditional( (manualBranding == "sellxed") )####Our payment plugins should have per default the correct settings for most of our customers' preferences. That means once you have entered the required credentials in the plugin configuration to connect your account to your website, the plugin should be fully operational. Should you be willing to receive detailed information on a setting you do not know, you may contact our support team who will be able to assist you further.
Our support team is at your disposal during regular business hours at: http://www.sellxed.com/support. Furthermore, you have the option of ordering our installation service. We will make sure the plugin is installed correctly in your shop: http://www.sellxed.com/shop/de/integration-und-installation.html
2Installation
At this point you should already be in possession of the module. If not, the module files should be available in your customer account here: sellXed Shop (Menu item "My Downloads"). In order to install the module in your Magento Shop, please follow these steps:
- Create a backup of your shop
- Extract the contents of the Zip you downloaded from the shop
- Copy the complete content of the folder "files" into the main directory of the server where your shop is hosted. In order to do this, use your usual FTP program. Make sure to merge the folders instead of replacing them
- Empty the cache and log into your shop again
3Dunning - Configuration
3.1Basic Settings
The descriptions for the options contain the necessary information. In the following, we will only mention a few key pointers regarding the options for the configuration.
3.1.1Activating Dunning for any Desired Payment Method
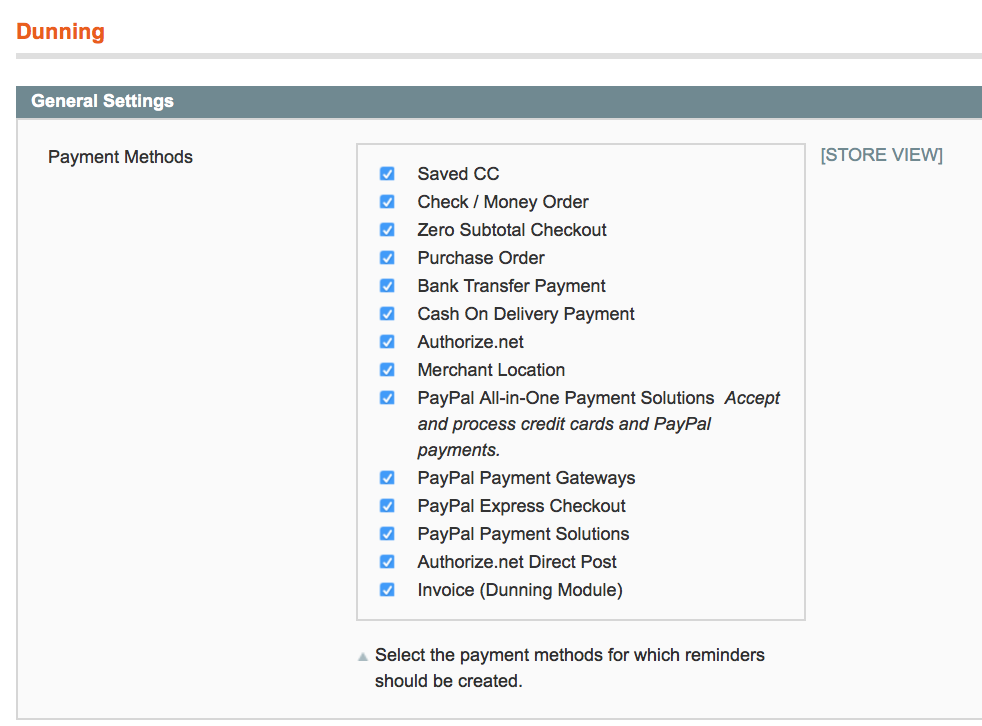
To change the basic settings, go to System > Configuration > Dunning.
In the basic settings we will configure the dunning option for the individual payment methods. You can link any payment method to the Dunning extension by selecting them in the list. Click on the button add to create a new dunning process. If you want to use the Dunning extension for invoices we recommend you to use the included payment method „Invoice (Dunning Module)“.
3.2Reminder Settings
The reminder settings can be adjusted at System > Configuration > Reminder.
3.2.1Dunning Level
The reminder system is flexible. You can define the dunning levels according to your processes and preferences.
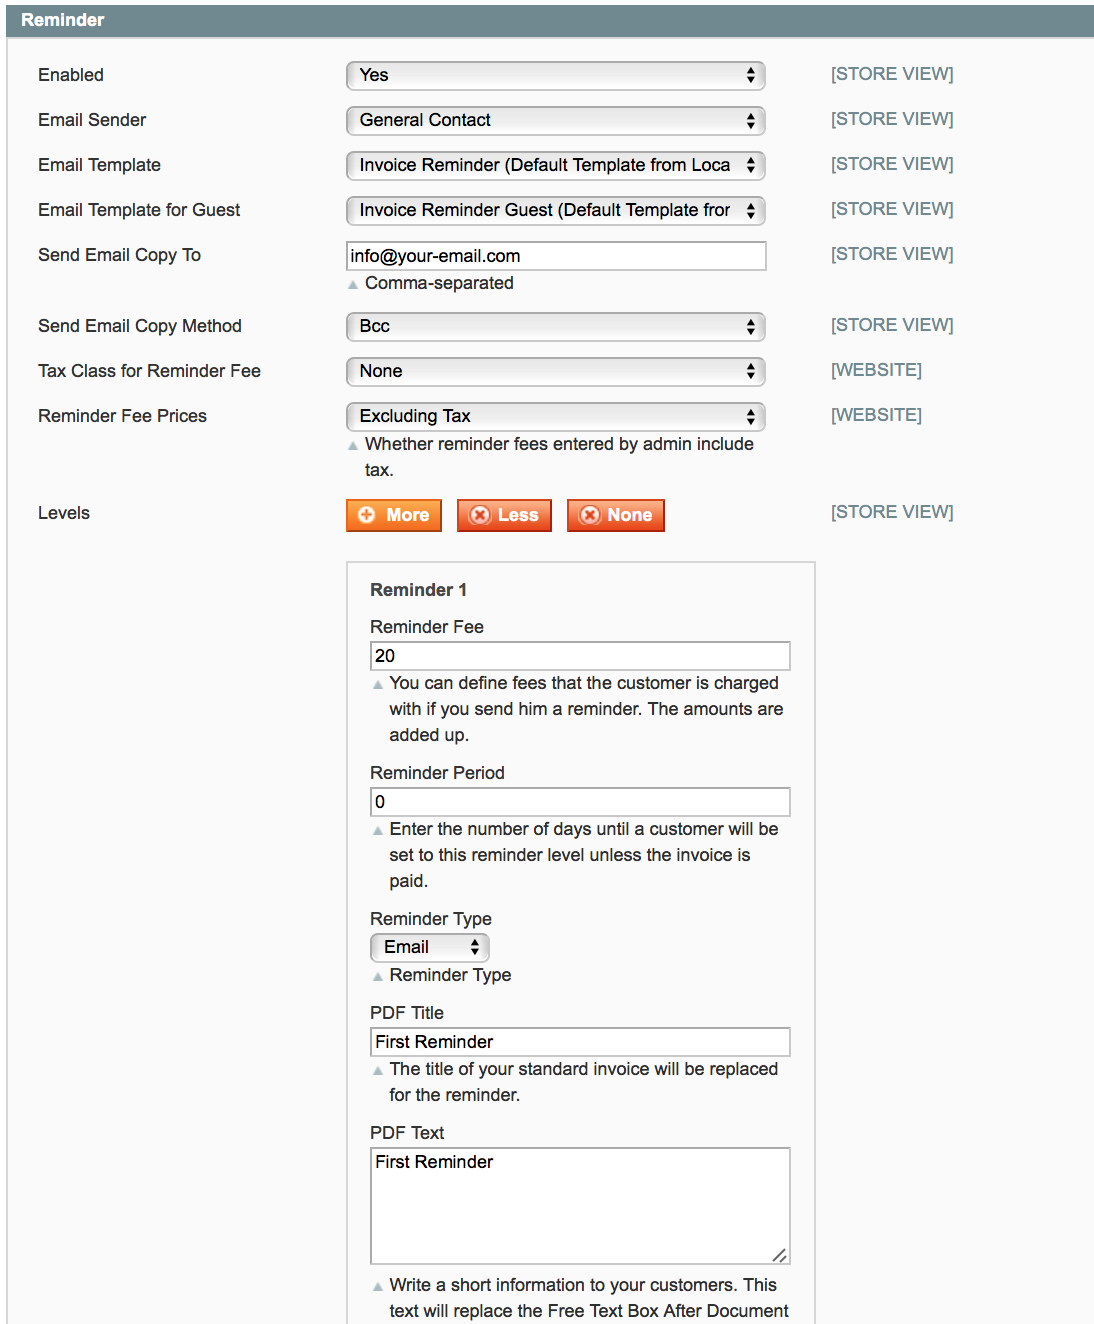
- The length of the dunning level [in days] corresponds to the amount of time between the order and the classification to this level. The update is conducted along with each reminder round (c.f. below).
- Reminder type: E-Mail: The reminder is sent as an e-Mail. The template can be adjusted in compliance with the Magento standard at System > Transaction e-Mails.
- PDF Print: The invoice is provided as a PDF document and can be printed out to be sent via postal service.
- PDF Title / PDF Text: If you want to use the provided customweb PDF extension to produce the documents, you can define a document title as well as a text after the document information (PDF extension below).
This way you can create as many dunning levels as you wish.
4Invoice PDF Configuration
The Dunning extension also includes a comprehensive PDF extension, which allows you to adjust the PDF templates according to your preferences. In general, all settings can be defined individually for each Store View. In addition, every document can be designed differently. All settings can be found at System > Configuration > PDF Templates.
The PDF extension follows the principle of template inheritance. You can configurate the standard template according to you preferences. In the next step, adjust the elements you would like to change for each delivery, invoice and reminder template. Otherwise the standard template is used. The settings for the PDF template can be found at System > Configuration > PDF Templates. Every PDF element can be adjusted. You will find additional information on the format options in the next chapter.
4.1Template Settings
4.1.1General Settings
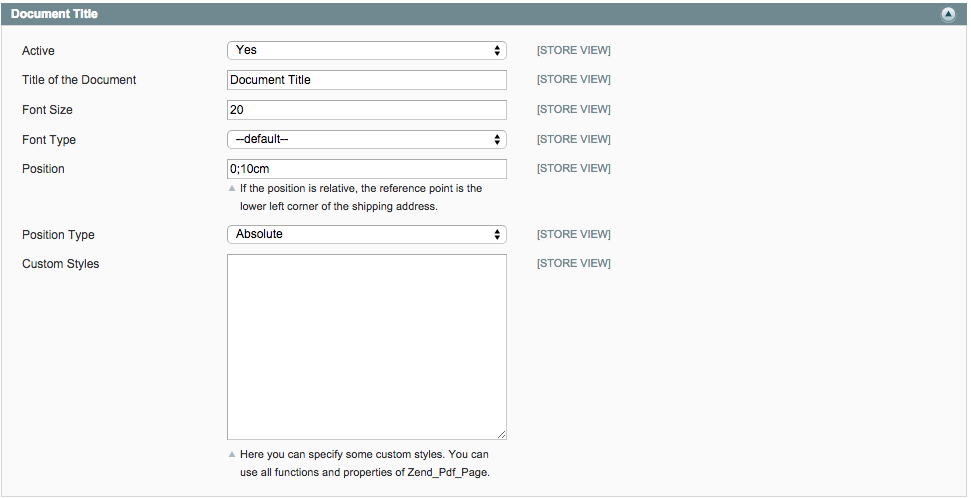
You can position the different elements of the invoice PDF according to the provided fields. Most options are self-explanatory. However we will discuss the most important fields briefly.
- File Template [PDF]: Here you can deposit a static background. The dynamic elemtens will be printed into this static PDF. Therefore, create a static PDF template which includes logo, sender, adresses etc.
- Margins [in cm]: The margins for the documentwill be defined in cm. These settings are relevant for longer continuous texts. When reaching the margin, a line break is entered automatically.
4.1.2Positioning the PDF Elements
You can position the elements with cm specifications. The top left corner is the reference point for the specifications. Regarding the information fields, we distinguish between the relative (position depending on the last element) and absolute elements. Depending on the element, the information field is classified as absolute or relative. For most fields you can choose which position you prefer.
The relative position is given in the format x;y. x refers to the horizontal offset; y refers to the vertical offset with the top left corner as reference point.
4.1.3Order Information:
In order to define the information fields shown here and to determine their order, use the following scheme: {Information Field;“Label“;clearance from the left margin in cm}
The following labels can be given in the invoice:
| Information field | Description |
|---|---|
| Order Number | Order Number |
| OrderDate | Order Date |
| InvoiceNumber | Invoice Number |
| InvoiceState | Invoice State |
| PaymentMethod | Payment Method |
| OrderStatus | Order Status |
| InvoiceDate | Invoice Date |
In order for the captions to be printed, the field captions have to be set to standard.
4.1.4Customisation
In addition, you can make customised adjustments. Here we refer to the ZendPDF Framework documentation (http://framework.zend.com/apidoc/1.7/Zend_Pdf/Zend_Pdf_Page.html).4.1.5Using a Different PDF Extension
You can use the extension in combination with any PDF module which you might have installed and configurated already. However, there are a few restrictions:
- The payment slip can only be attached to the last page
- The document title and content cannot be adjusted for each dunning level as shown above
In order to use your own extension, a few code adjustments have to be made. Adjust the category definition in the following file:
/app/code/local/Customweb/Dunning/Model/PdfTemplates/Invoice.php the class Customweb_Isr_Model_PdfTemplates_Invoice extends Customweb_PdfTemplates_Model_Invoice should be replaced with: class Customweb_Isr_Model_PdfTemplates_Invoice extends {PDF Extension category which compiles the invoice PDF}
5Working with the Magento Dunning Extension
Here you will find the most important information on how to employ the Magento Dunning Extension in the most efficient way.
5.1Starting the Dunning Process
Within your Magento backend navigate to Sales > Invoices. This is where you will find all your existing invoices.
- To start the dunning process, you may select the invoices you wish to process.
- In the dropdown menu, select 'Process Reminders'. If you have previously not chosen any invoice, every entry will be reviewed. If an invoice is overdue, it is moved to the respective dunning level automatically and the customer will be informed via e-Mail or a PDF will be provided, depending on the settings defined above.
- Click on Submit to start the dunning process for your selection

The invoices will be processed accordingly and moved to the corresponding dunning level. The customer will be notified depending on your settings by mail or a PDF will be provided. In the column Reminder Status you will find the status of the invoice and will be able to determine whether an invoice has entered the dunning process or not. Just besides the status you can also check at which dunning level the invoice is currently placed.